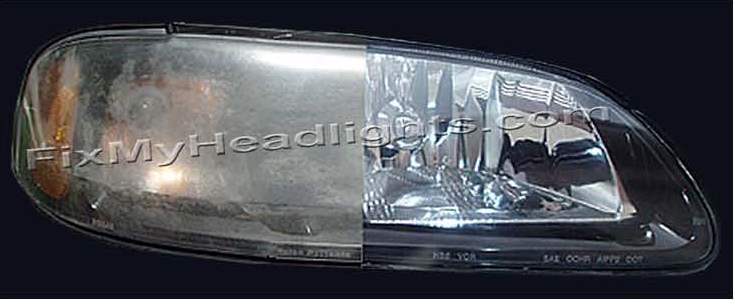
EZ4U2 Headlight Restoration Kit Produces Professional Results Everytime

|
|
|
|
|
|
|
|
|
|
|
|
|
|
|
|
|
|
|
|
|
|
|
|
|
|
|
|
|
|
|
|
|
|
|
|
|
|
|
|
|
|
Headlight Restoration Service
Search by Keyword
Headlight Cleaning and Restoration Saves You Hundreds $$$$
There are many methods of cleaning and restoring your headlights.
The difference in the different method of headlight restoration is how long will it last.
Headlight restoration is not very difficult to do but it does require some skill and time.
If you are a handy person then cleaning and restoring your headlights may be a lot easier to do.
Methods of Headlights restoration
- sanding polishing and sealing method (most popular)
- Buffing with compound to a shine
- wipe on and wipe off method (temporary fix)
- sanding and spraying method
The headlight restoration method I will go over here is the sanding, polishing and sealing.
First you will need to get a couple of things
- sand paper 400 / 800 /1000 / 2500 grit
- polishing compound
- a good headlight restoration sealer
- Masking tape
- spray bottle
- paper towel or rags
- lint free applicator or shop paper towel
First clean your headlight with soap and water to remove all the debris from your headlights.
Second tape off your headlight as to prevent your vehicle from any rub off sanding to the body of your car.
Now that your car is taped off proceed to start sanding your headlights with the 400 grit sanding paper.
IN HEADLIGHT RESTORATION SANDING IS THE MOST IMPORTANT STEP!!
CAUTION: You must keep your headlights moist with your spray bottle of water.
Sand with the 400 grit sand paper until the headlight lenses looks clear of all blemishes and there is no more yellow.
Now wash the headlight to remove all the 400 grit residue.
Continue to sand with the 800 grit then to the 1000 and then 2500.
It is important to wash the headlights after every sanding change.
NOTE Sand from right to left in order to get the best results.
At the end of sanding with 2500 your headlight should look clean and a little hazy or cloudy.
That's pefectlly normal
Now you are finished the sanding in your headlights restoration you need to polish your headlight.
I suggest using a water soluble compound or polish. Most polish of compound work best
by using a buffing pad with a drill or buffing machine. In buffing your headlights you must use
caution as not to spend to much time on any one spot as this will burn your headlight lense.
Keep moving your buffer all over your headlights.
(Before using, read the instruction on whatever compound you are using)
After you have polished the headlights wash them off in order to seal them.
It is important to dry your headlight in this final stage in your headlight restoration.
Water will be your enemy in sealing your headlights
According to the type of sealer you use be sure to read the instruction on how to apply.
In my experience with experimenting on sealer application most sealers in headlight restoration
is best applied from left to right in a slow method. You must overlap every pass of your headlight
restoration sealer.
After using your headlight restoration sealer wait for about 15 minute to dry and you are done
Your headlight should look crystal clear.
Congratulations
You have now done your own headlight restoration.
If you can't do your headlight restoration for yourself, simply
We are located to Pembroke Pines Florida.
Our Service Extends To Miami Dade & Broward County.
Pembroke Pines, Miramar, Weston, Cooper City, Miami Gardens, Miami Springs, Miami, Southwest Ranches,
Tamarac, Lauderhill, Ft. Lauderdale, Cooper City, Margate, Coral Springs, Dania Beach, Hollywood, Hialeah,
Doral, Sunrise, Plantation, Davie and Sawgrass
If you don't see your city please call us. We'll let you know if we come to your area.
Headlight Restoration Service Video Clip
customerservice@fixmyheadlights.com